Arduino IDE build process explained (in details)

Many beginner embedded developers start their journey with an Arduino development board because it’s extremely easy to use, even with no prior experience. After installing the Arduino IDE and connecting the board, you can simply choose an example sketch and, with just two clicks, build and upload it. Does this sound like you? If so, this post will help you understand what an Arduino sketch really is — and what happens “under the hood” when the Arduino IDE builds your code. By understanding this process, you’ll be ready to move on to more professional boards and development setups.
Understanding Arduino IDE build process
- Arduino UNO R4 WiFi board
- Arduino IDE 2.3.6
- Linux Mint
If you’re using a different board, IDE version, or operating system - don’t worry! You can still follow along. Some details may just look a little different on your setup.
Build preparations
Build your first sketch
Pick the right board from Select Board menu. In my case it’s Arduino UNO R4 WiFi.
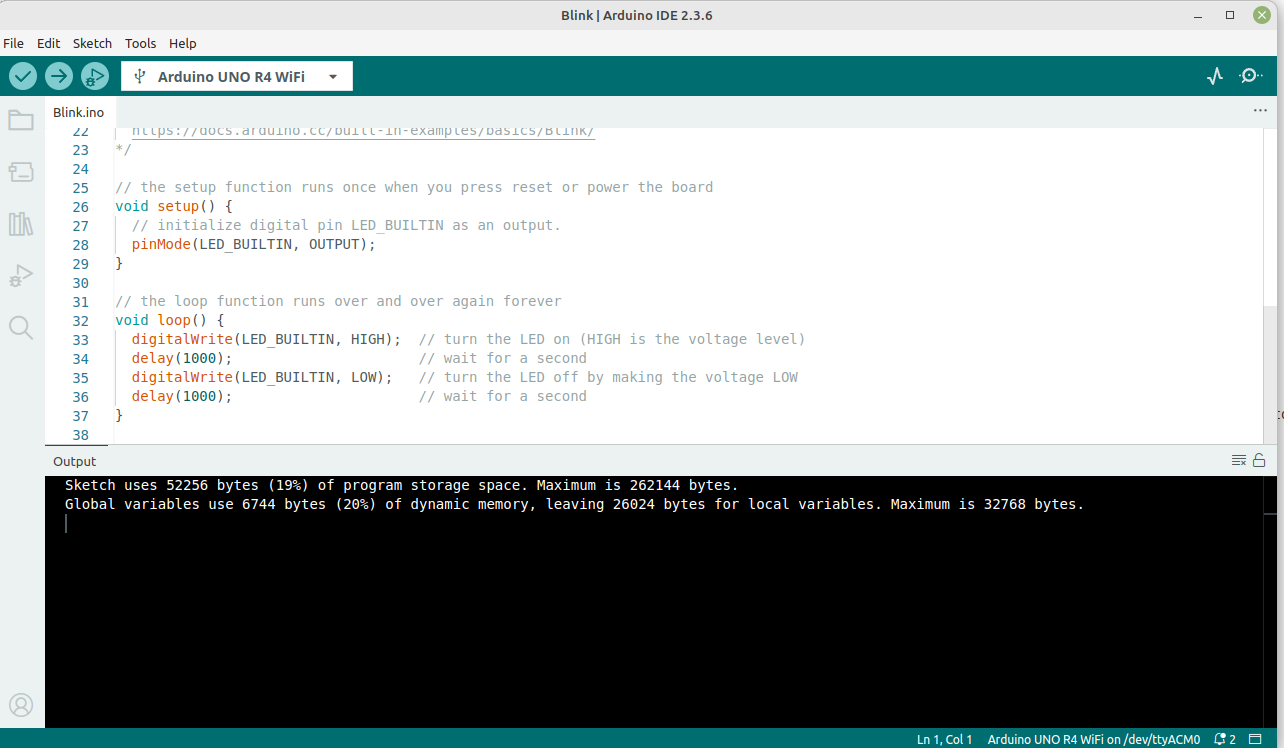
Load up the Blink example and make a minimal change (like changing the delay value). Then save and store new sketch in your sketchbook and click Verify/Compile. Observe the Output window. You just triggered the entire build process with a single click. The sketch is ready to upload to your board. But if you didn’t change the Arduino IDE’s default settings yet, the Output window will only contain minimal information on program space and memory, saying nothing about actual compilation process.
Enable verbose output
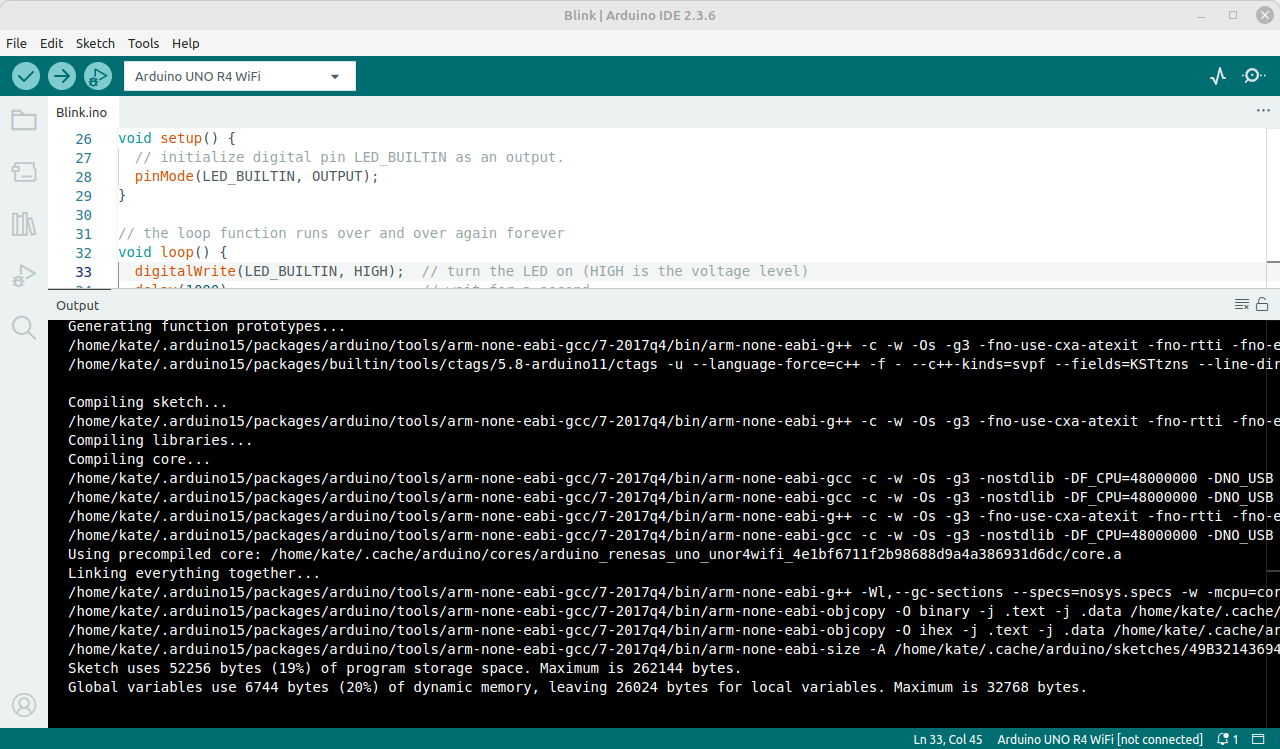
If your Output window looks like above, you need to mark File->Preferences->Show verbose output setting for both compiling and upload, and compile again.
Now the output will be complete.
Let’s break it down to atoms!
Board and package identification
When building a sketch, the Arduino IDE needs to know exactly which board you are using - that’s why at first step you had to choose board from Select Board menu. This ensures the compiled code matches the board’s architecture, hardware, pin mapping etc.
|
|
This information is called the Fully Qualified Board Name (FQBN). It is unique for each board and defines exactly which hardware you are targeting. It consists of three segments:
- Vendor:
arduino(it’s official Arduino package) - Architecture:
renesas_uno(Renesas-based boards family) - Board:
unor4wifi(exact model: Arduino Uno R4 WiFi).
If you choose wrong board, the code may compile but fail at runtime, or compilation may fail.
Arduino15 directory
The build log also shows the location of the Arduino15 directory on your system. This is the hidden folder used by the Arduino IDE, containing user preferences, downloaded board packages (cores, toolchains, board definitions) and libraries that the IDE automatically installs.
The exact location depends on your operating system. You can find the official reference here: Arduino15 folder.
In some cases, you may want to move the Arduino15 folder - for example, to free up space on your primary drive.
To do this:
-
Copy the Arduino15 directory to your desired location.
-
Open the file
~/.arduinoIDE/arduino-cli.yamland update thedirectories:datapath, for example:
|
|
-
Restart the Arduino IDE. It will now use the new Arduino15 location. Verify the build output to ensure everything is working correctly.
-
Once you’ve confirmed everything works correctly, you can safely delete the old folder.
In this directory there is a file .arduino15/packages/arduino/hardware/renesas_uno/1.4.1/boards.txt, where you will find the collection of board definitions.
This file lists all supported boards. Each board has its own section with key-value pairs that tell the IDE how to compile, upload, and debug for that target.
Here’s the entry for the Arduino UNO R4 WiFi:
|
|
Thanks to these settings, after you pick your board from the Select Board menu, the correct toolchain, compiler flags (like MCU, clock speed), upload tool and bootloader info are applied automatically.
Arduino core
While we’re here, take a look at the package used in your build: .arduino15/packages/arduino/hardware/renesas_uno/1.4.1/cores
(check your build log to find your exact path — it may differ depending on your hardware or version).
This directory contains Arduino Core, the essential components of your Arduino program.
You may have noticed that in your sketch you only implement the setup() and loop() functions. But who calls them, and in what context?
Open main.cpp and see for yourself - there’s a lot of logic the Arduino Core already provides for you.
Once you’ve explored that, let’s go back to the Build Output and see what happens next.
Creating the build directory
When you compile a sketch, the Arduino IDE doesn’t build it directly in your project folder.
Instead, it creates a build directory (a per-sketch cache) in a hidden folder to store all intermediate files.
This lets the IDE produce builds for different boards/variants without making a mess in your sketch folder.
You can spot the build directory path in the build log.
On my system it’s:
/home/kate/.cache/arduino/sketches/D7CC1D7CA645BCFE67207C07A05B3A2A/sketch/.
Open this folder. You’ll see the build artifacts (object files, preprocessed sources, and the final .bin/.hex/.elf binaries).
.hex, .bin, .elf and .map inside the sketch sources folder so it’s easy to find later.Now, let’s take a look at next lines from Build Output.
Preprocessing
Detecting libraries used
The first phase of the build is preprocessing.
Before any actual compilation happens, the Arduino IDE scans your code to figure out which additional libraries your sketch needs. In the build log, you’ll see something like this (shortened for readability):
|
|
Here, the compiler is invoked with the -E flag, which tells it to stop after the preprocessing
stage and not produce any compiled output.
It will only expand all #include directives and check which libraries are required for your sketch.
Based on this, the IDE knows which libraries should be compiled and which
include directories need to be added to the build process.
For a simple sketch like Blink, this stage isn’t very exciting: it doesn’t pull in any additional libraries. That’s why the build output doesn’t show anything under Detecting libraries used…. Open other example sketches, such as those from WiFiS3 or EEPROM, and you’ll see how more complex projects trigger detection of multiple libraries.
Why such preprocessing is needed?
Arduino IDE compiles only the libraries that your sketch needs. In other development environments, this step is usually the developer’s responsibility: you must explicitly tell the compiler which libraries or dependencies to include in the build. Arduino automates this process, scanning your code and selecting what’s needed.
Notice the toolchain path: .arduino15/packages/arduino/tools/arm-none-eabi-gcc/7-2017q4/bin/.
Besides the compiler itself, toolchain contains other useful tools like objdump. We may use it later!
Automatic function prototypes generation
The next stage in the build process is automatic function prototype generation. In C or C++, each function must be either defined or declared before it’s called. In Arduino, you don’t need to worry about that - you can write whatever functions in any order, without adding their prototypes. How does it work? Arduino generates these prototypes for you!
Here’s what the build log shows:
|
|
Again, the compiler is invoked with the -E flag, meaning only the preprocessor runs.
Behind the scenes, the Arduino IDE performs these steps for you:
-
Concatenate .ino files
All
.inofiles in the sketch folder are concatenated into a single file (MyBlink.ino.cpp). -
Preprocess it
The new
MyBlink.ino.cppis input for the preprocessor:#includes are expanded and macros replaces. The expanded file is stored as/tmp/1121713208/sketch_merged.cpp. -
Scan functions
Tool
ctagsis running over expandedsketch_merged.cpp, to extract function symbols. -
Generate prototypes
Based on the
ctagsresult, the IDE inserts forward declarations (prototypes) for you. This way, you don’t need to worry about undeclared functions, functions order, etc. -
Store prototypes into .ino.cpp
The resulting version is stored into
MyBlink.ino.cpp. This is what the compiler will actually use later on.
Your simple sketch (MyBlink.ino):
|
|
gets transformed into (MyBlink.ino.cpp):
|
|
To summarize differences:
-
#include <Arduino.h>in preprocessed file there is
<Arduino.h>header added, -
#linemacrosThese keep compiler error messages pointing to the right lines in your .ino file. Without them, errors would show up with the line numbers of the generated .cpp, which would be super confusing.
-
function prototypes are added.
Compilation
Sketch compilation
Here’s where your code finally turns into machine instructions.
|
|
Now we reached the sketch compilation.
Compiler is ivoked with -c flag, which means compile only (generate object code .o, don’t link).
Input: MyBlink.ino.cpp - the auto-generated sketch with prototypes, includes, and line directives.
Output: MyBlink.ino.cpp.o - machine-code object file, ready to be linked later.
I shortened the compilation command, so it’s not in the snippet above, but in IDE we can observe a lots of compilation flags that were used. Some highlights:
-Os→ optimize for size.-g3→ include debug info at max level.-fno-rtti,-fno-exceptions→ strip C++ runtime features to save space.-nostdlib→ don’t link against standard system libraries.-mcpu=cortex-m4 -mthumb -mfloat-abi=hard -mfpu=fpv4-sp-d16→ target an ARM Cortex-M4 with hardware floating point.-Iand@.../includes.txt→ add search paths for Arduino core and variant headers.- Many
-D...→ defines for board, CPU frequency, Arduino version, etc.
Most advanced IDEs let you change compiler settings like optimization level, debug info, or extra flags right from a project menu.
Arduino IDE is so simple that it doesn’t offer this option: you don’t get a button or menu for that.
If you want to change some settings, you’ve got two ways:
- Edit build recipes: you can change files like
platform.txtorboards.local.txtto change or add your own compilation flags. - Use Arduino CLI: the command-line tool gives you more flexibility and can build your sketch with whatever options you like.
At this point, your sketch has been turned into machine code, stored in MyBlink.ino.cpp.o.
This file contains your setup() and loop() code, ready to be linked with the Arduino core and libraries in the next step.
Compiling libraries
|
|
For the Blink sketch this step is empty. In the previous phase (Detecting libraries used) no additional libraries were found.
Blink only relies on core Arduino functions such as pinMode, digitalWrite, and delay, which are part of the board core, not separate libraries.
In more advanced sketches the output looks different. For example, in WiFiS3/ConnectWithWPA the WiFiS3 library is detected and its source files are compiled here.
Compiling core
|
|
The core is the foundation of every Arduino program. It provides the low-level code relevant to the specific board you selected, like startup code, pin mappings, and implementations of important functions. Instead of recompiling the same core files every time you build, the Arduino IDE uses precompiled objects from a cache. It speeds up the compilation.
Linking everything together
Once all the individual files are compiled, the Arduino build system needs to link them into a single program. I shortened the link command to present only the most important stuff:
|
|
After this step, the final binary will be MyBlink.ino.elf.
Please note which libraries are linked into the build:
libfsp.a→ the Renesas Flexible Software Package, providing hardware drivers and low-level functions for peripherals.core.a→ the Arduino core for this board. Libraries above are board support libraries. These are part of the Arduino board package (for the Uno R4 in this case). They are not optional user libraries, so they don’t appear in the detection phase.
Toolchain standard libraries:
-lstdc++→ the C++ standard library,-lsupc++→ low-level C++ runtime support,-lm→ the math library,-lc→ the standard C library,-lgcc→ helper routines from GCC itself,-lnosys→ stubs for system calls.
Finalizing build
Creating binary and hex files
After the ELF file (MyBlink.ino.elf) is created, the build system uses objcopy to generate hex and bin formats:
|
|
Both formats contain the same program, just encoded differently for different flashing tools.
Measuring the program size
Finally, the build system reports memory usage with arm-none-eabi-size:
|
|
Cleaning the build
Unfortunately, Arduino IDE does not offer the Clean build or Force rebuild option ([1],
[2],
[3]). The workaround for it is to manually delete the cached build directories we mentioned earlier.
A much better alternative is to use Arduino CLI, which is more flexible and gives you full control over compilation and rebuilding.

